Can You Upload Html Website on Azure
This browser is no longer supported.
Upgrade to Microsoft Edge to accept reward of the latest features, security updates, and technical support.
Create a static HTML web app in Azure
Azure App Service provides a highly scalable, self-patching web hosting service. This quickstart shows how to deploy a basic HTML+CSS site to Azure App Service. You'll complete this quickstart in Cloud Shell, just y'all can also run these commands locally with Azure CLI.

If you don't have an Azure subscription, create an Azure costless account before you begin.
Prerequisites
-
Use the Fustigate environment in Azure Deject Shell. For more information, run across Azure Deject Beat Quickstart - Bash.

-
If you prefer to run CLI reference commands locally, install the Azure CLI. If yous are running on Windows or macOS, consider running Azure CLI in a Docker container. For more information, see How to run the Azure CLI in a Docker container.
-
If you're using a local installation, sign in to the Azure CLI by using the az login command. To finish the hallmark procedure, follow the steps displayed in your terminal. For additional sign-in options, encounter Sign in with the Azure CLI.
-
When you're prompted, install Azure CLI extensions on first use. For more data about extensions, see Use extensions with the Azure CLI.
-
Run az version to find the version and dependent libraries that are installed. To upgrade to the latest version, run az upgrade.
-
Download the sample
In the Cloud Shell, create a quickstart directory and so change to information technology.
mkdir quickstart cd $Dwelling/quickstart Next, run the post-obit command to clone the sample app repository to your quickstart directory.
git clone https://github.com/Azure-Samples/html-docs-howdy-world.git Create a web app
Change to the directory that contains the sample code and run the az webapp upward command. In the post-obit example, supersede <app_name> with a unique app name. Static content is indicated past the --html flag.
cd html-docs-how-do-you-do-world az webapp up --location westeurope --proper name <app_name> --html The az webapp up command does the following actions:
-
Create a default resources grouping.
-
Create a default app service plan.
-
Create an app with the specified proper noun.
-
Nix deploy files from the current working directory to the web app.
This command may take a few minutes to run. While running, it displays information like to the following instance:
{ "app_url": "https://<app_name>.azurewebsites.cyberspace", "location": "westeurope", "name": "<app_name>", "bone": "Windows", "resourcegroup": "appsvc_rg_Windows_westeurope", "serverfarm": "appsvc_asp_Windows_westeurope", "sku": "Free", "src_path": "/dwelling house/<username>/quickstart/html-docs-hullo-globe ", < JSON data removed for brevity. > } Make a notation of the resourceGroup value. Y'all need it for the clean up resources section.
Browse to the app
In a browser, go to the app URL: http://<app_name>.azurewebsites.net.
The page is running as an Azure App Service web app.
Congratulations! Yous've deployed your beginning HTML app to App Service.
Update and redeploy the app
In the Cloud Beat, type nano index.html to open the nano text editor. In the <h1> heading tag, alter "Azure App Service - Sample Static HTML Site" to "Azure App Service", equally shown below.

Save your changes and get out nano. Utilise the command ^O to salve and ^X to exit.
Yous'll now redeploy the app with the aforementioned az webapp up command.
az webapp upward --location westeurope --name <app_name> --html Once deployment has completed, switch back to the browser window that opened in the Browse to the app step, and refresh the page.
Manage your new Azure app
To manage the web app you created, in the Azure portal, search for and select App Services.

On the App Services page, select the name of your Azure app.
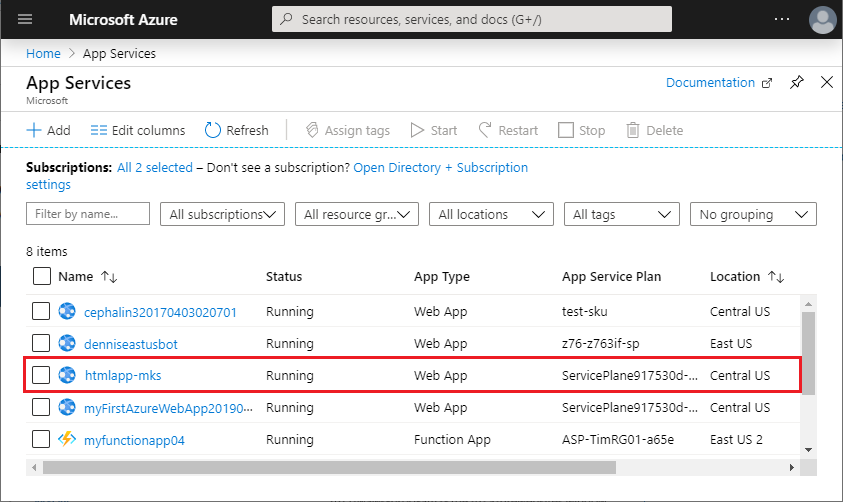
You lot see your spider web app's Overview page. Here, you can perform basic direction tasks like browse, stop, start, restart, and delete.

The left card provides different pages for configuring your app.
Make clean upwards resources
In the preceding steps, you created Azure resources in a resource group. If you don't look to demand these resources in the future, delete the resource group by running the post-obit control in the Cloud Shell. Recollect that the resources group name was automatically generated for you in the create a web app stride.
az group delete --proper name appsvc_rg_Windows_westeurope This command may accept a infinitesimal to run.
Next steps
Feedback
Submit and view feedback for
Source: https://docs.microsoft.com/en-us/azure/app-service/quickstart-html
0 Response to "Can You Upload Html Website on Azure"
Postar um comentário